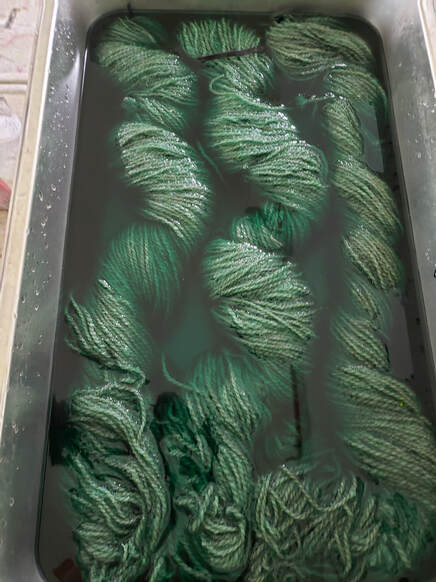
 my Variegated yarns are yarns that are dyed different colors in the same skein of yarn. They are so fun to work with as the color is constantly changing throughout the skein! I am pretty sure I was watching a video by Essence of Autumn dyeing in this way and thought it would be fun to try. The idea of this technique is that the dye is not able to penetrate the yarn evenly due to the twist. It was indeed fun and made such unique yarn that now once a year after spring shearing I buy all the wool from a local Jacob sheep farm, process the wool out into a worsted weight very rustic yarn, and then dye about half of the yarn using this technique with acid dyes for wool. Since I am working with 100% wool yarn that has been untreated the pre-soak, citric acid mordant, and heat play an extra important role in getting the dye to take. I have found the heat to be an extremely important part of exhuasting the dye with natural yarns so I like to make sure I get to as high a temperature as I can but not simmering ~ 180 degrees. 1. Soak yarn in a water bath with a drop of Dawn dish detergent mixed in for at least 30 minutes prior to dyeing. 2. Add water to your dye pan. Using a casserole pan or larger (I use a metal commercial size pan) fill until the water will cover most of the yarn once it is twisted. 3. Add citric acid to the water and mix in well. Citric acid is the mordant that will help the dye adhere to your yarn. (I add about 1 TBSN of citric acid for 2-3 skeins) For this type of dyeing you want the citric acid already in the water to ensure the yarn picks up the dye quickly which helps to cause a secondary uneven tonal effect. 4. Twist your skeins individually and lay lenghtwise in your pan. I twist the skeins by simply holding the top of one and twisting slowly moving downward along until the whole skein until I reach the bottom of the skein. I recommend adding extra twist as the yarn will settle a bit once it gets into the water. 5. Turn the heat on and let water heat up. Once some steam starts to rise I add the first color to the pan pouring it in stripes from one end of the pan the other. It really doesn't have to be perfect because the yarn is going to pick it up in different ways so don't stress too much. I then use my plastic mixing spoon to push down the yarn and move the yarn around a bit. If twisted parts of the yarn are sticking out of the water just use your plastic spoon to gently push the bumps down for long enough to let them pick up some dye in those parts. 6. Allow the water to heat until just under simmering and the dye has exhausted out meaning the water is just about clear. 7. Open up the skeins. Once the water is just about clear, turn the heat down a bit and open up the skeins so all the yarn is exposed in the water. BE CAREFUL as the water AND yarn are very hot. I use tongs to pull the yarn out and let it naturally unwind. While holding with tongs I use the plastic spoon to help place the opened yarn back in the water. 8. Add the second color. Again it doesn't have to be exact as the yarn is going to pick up the color irregularly. I use the same method pouring in stripes from one end to another and then using my platics spoon to push the yarn down and move the dye around a bit. 9. Bring heat back again until water is just under simmer and let it be! 10. Let it cool. Once the water has exhausted again turn off the heat and let everything cool to room temperature in the pan. I most often just leave my yarn to sit overnight to ensure it is cool and that the dye is set. That is all there is to making this fun variegated yarn! There are so many different dye techniques and lots of wonderful dyers out there sharing what they know. Some of my favorites are Essence of Autumn (as mentioned above), Fiber for the People and Hue Loco. Craftsy also offers a whole series of acid dyeing videos if you want to invest a little bit of money in their subscription service. I hope this helps you experiment with a new dyeing technique! Please feel free to ask any questions below or tell me about your favorite technique. Thank you for reading! 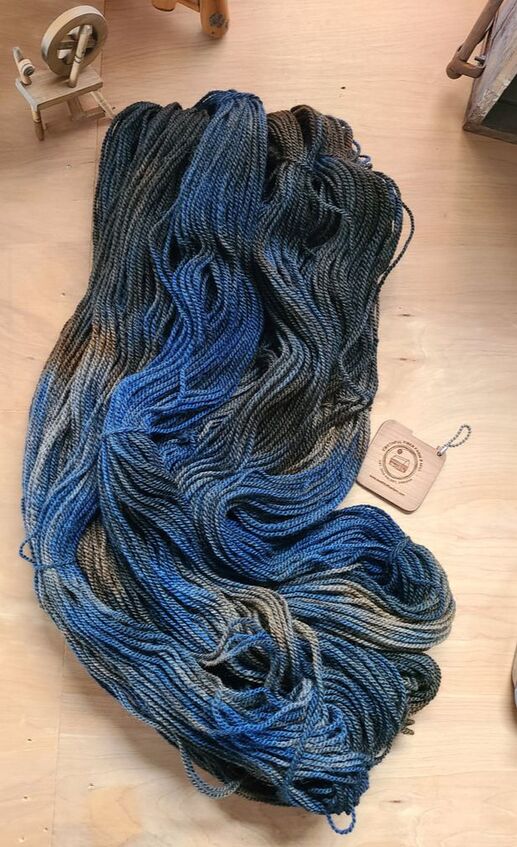 Ewethful's Worsted Weight Jacob wool yarn - Blue 1st color, brown 2nd color. Colorway Storm's Coming
2 Comments
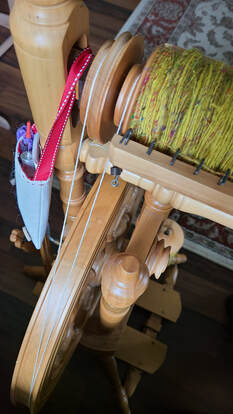
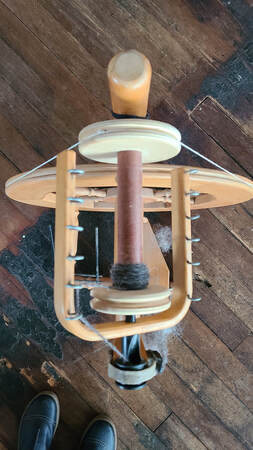
I recently dove down a rabbit hole of handspinning wheels when I was sitting at my Ashford Kiwi wheel thinking to myself, why does the yarn on my bobbin look all wrong? Now keep in mind that this was my first spinning wheel, the wheel I spun on for years, but as of recently I mainly use it as the wheel I ply yarn on. Well there was a reason the yarn looked different. Not because it was wrong but as I found out thru research simply because of the type of wheel it is. I could not believe how much I didn't know about my wheels and want to share a little of what I learned with you here. Let's start with the basics, there are 3 main types of spinning wheel when it comes to mechanics. 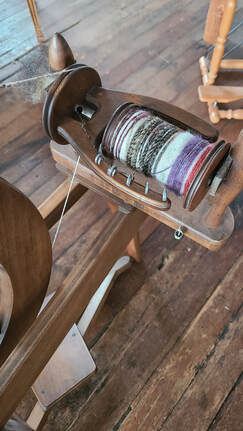 Pictured is an Ashford Traditional spinning wheel. You can see there is one band from the drive wheel to the flyer whorl. The Scotch Tension is the metal coil and wire to the right. Pictured is an Ashford Traditional spinning wheel. You can see there is one band from the drive wheel to the flyer whorl. The Scotch Tension is the metal coil and wire to the right. 1. Single Drive, Flyer lead or Scotch Tension wheels This is the most commonly used type of wheel. The Scotch tension wheel, as it is often called, allows for the most adjustments making it able to spin a lot of different yarn weights.
 Pictured is a Kromski Minstrel spinning wheel. You can see the band loops from the drive wheel over the bobbin and the whorl of the flyer. Pictured is a Kromski Minstrel spinning wheel. You can see the band loops from the drive wheel over the bobbin and the whorl of the flyer. 2. Double Drive wheels This type of wheel has the ability to spin the finest yarns. This is also the most complex of the wheel types.
 Pictured is a Louet S75 spinning wheel. You can see the band attaches from the drive wheel to the bobbin. In the lower portion of the photo you can see the band over the flyer shaft to adjusting tension. Pictured is a Louet S75 spinning wheel. You can see the band attaches from the drive wheel to the bobbin. In the lower portion of the photo you can see the band over the flyer shaft to adjusting tension. 3. Single Drive, Bobbin lead wheels This type of wheel is very simple but also the most difficult to make adjustments to.
I have garnered a lot of my information from a very comprehensive book called The Big Book of Handspinning by Alden Amos. This book is densely filled with all the information you may ever need to know about the craft.
So there you have it. A brief introduction into different spinning wheel mechanics! Please keep in mind that these 3 types come in all different shapes, sizes and styles. If you aren't sure what kind of wheel you have, sit down and take a look at how many band loops you have and where they are connected? This should help you answer the question. I also walk step by step thru the wheels in Episode 22 of Being Ewethful on YouTube. I will be going more in depth with each wheel over the coming months so please stay tuned for more videos that I hope will help you on your handspinning journey. What kind of wheel(s) do you have? What is your favorite and/or what wheel do you long to own one day? I would love to hear from you! |
AuthorI am Kim Biegler, the owner and operator of Ewethful Fiber Farm & Mill. I create hand spinning fibers from locally sourced wool and teach others online how to hand spin their own yarn. Archives
August 2023
Categories |
 RSS Feed